Flatlander Freedom - A Scientific Approach to Hunt Prep
We’ve all been there. You plan for months, apply for your tag, put in countless hours of shooting and preparation and the day finally comes to load the gear and head to the high country. Hunting season is finally here!
Climbing to higher ground, the anticipation mounts as you set camp and prepare for opening day. If you are like me, sleep quality on the first night is typically as turbulent puddle jumper coming in for landing as the excitement builds. You stare at the tent ceiling counting the hours until you gear up, load the pack and head in for the first chance to hear the cacophony of bugling bulls you’ve dreamt about for the past year. As the harsh chime of the alarm hits your ears, you stand to attention like a recruit at basic training. It’s go time! The sense of nervousness sets in hoping that you have done all you can to be ready. You scouted, picked your spot and hope that hard work and good fortune will get yourself in range to make that perfect shot.
With the glow of the headlamp guiding each step, you approach that first ridge and the combination of adrenaline and initial sweat hit like a ton of bricks and your heart pounds like a drum. It is at this very moment I always question, “did I prepare enough for this season?”
Every year I feel like this is how archery season begins. This is the point of no return. You’re either prepared or you’re not. There aren’t short cuts and you can’t cheat the mountain. The effort put in leading up to this moment will determine the upcoming days and how effectively I will be able to navigate terrain and keep doing it hour after hour, day after day.
This is basis for this article. We will dive into more than just putting your head down and embracing the “bucket of suck it” as I like to call it that few people understand and yet so many love. This is intended to be a guide to enhance your preparation for your next hunt and provide a better understanding of what it really means to Hunt, Hike and Harvest in the high country.
Flatlander Freedom! An Altitude Adjustment?
Making the decision to chase an elk, deer or any other animal in the high country has always required a level of commitment that hunters have historically viewed and accepted as a noble and physically demanding endeavor. Any hunter who has set foot in the mountains knows that the subject of altitude is sure to be part of the conversation at some point. Speak to those that have had success and routinely trek into this terrain and they will tell you success at altitude often has a lot to do with how prepared you are for such a feat. I have personally spoken with outfitters that have expressed that the quality of a clients trophy often has a direct correlation to their ability to cover miles throughout the course of a hunt.
Connecting the Dots:
Outside of the fact that we know altitude will inevitably make things more difficult, can anything be done to counteract it? “If I live at lower altitude should I expect the cards are simply stacked against me?” These are common questions will create better clarity towards from a simple perspective. Regardless of the constraints you may have, there are strategies that can be used to improve your preparedness and enhance your ability to thrive in the high country.
But Wait There’s More!
With the increase in altitude, pack weight, age or any other variable there are some other things that coincide with the increase in output. First is an increase in water loss due to a combination of perspiration and respiration from the increase in effort (an average hunter will burn between 10-15 calories per minute and data suggests that some may burn up to 7,000 calories or more per day)! This makes hydration super critical as a drop in hydration of even 3% may decrease muscle function, cause fatigue in muscles, especially in the diaphragm (critical for breathing) and abdominal muscles which are important for maintaining posture and stabilizing the trunk and any load you are carrying. Additionally, this may cause a loss of coordination making foot placement and precision while hiking more problematic and increase chances of injury. The loss of appetite, head aches and poor sleep quality may also be affected by altitude.
If you have ever felt or experienced any of these symptoms, you now understand how these variables can be detrimental to a successful hunt but may even increase your chances for injury or impact the quality of your hunt as a whole.
Solutions and Suggestions:
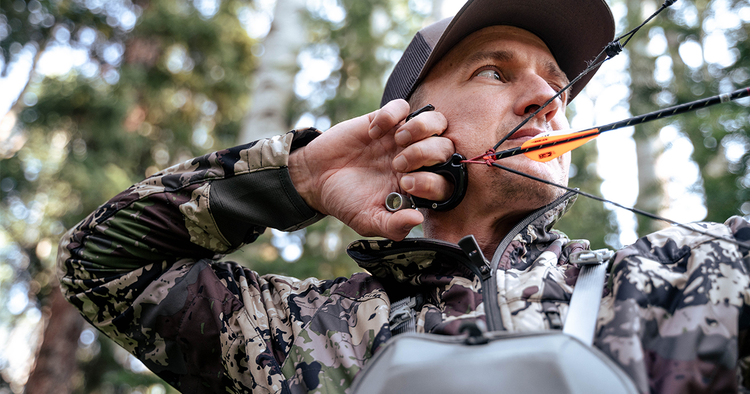
Where do we begin? Typically, we need to gather some basic information and evaluate where you currently are with your fitness. Check basic heart rate first. This can be done with a multitude of free apps you can use directly with your phone, Heart Rate watches and straps or it can be found manually by placing your index and middle finger as shown in figure 1 or figure 2 with light pressure until you feel a pulse. Count the number of beats for a total of 6 seconds. Simply add a zero “0” to this number and that is your heart rate. Example: 8 beats counted equals 80 beats per minute heart rate. This will be important before, during and after the following test.


 Figure 1: Radial Pulse Figure 2: Carotid Pulse
The Test:
Step 1:
Take resting heart rate (HR). Should be done in a rested state (usually done upon waking up)
Step 2:
Measure a 1 mile course: This can be done by driving a 1/2 mile distance from your home. This doesn’t have to be on a trail or track or track using a device you may already own. There does not need to be any incline or added difficulty for testing purposes either.
Step 3:
Walk to the 1/2 mile marker and back as quickly as you can and then record the time. Check HR at your 1/2 mile marker and at the end marker and record the pre, during, and post heart rates.
Step 4:
Take a 3-5 minute break until your (HR) returns to your pre test status. (Check HR each minute during recovery to track). Do not start second test until you are within 10 beats of resting HR. Take as long as is needed to achieve resting HR.
Step 5:
Load your pack or backpack with 30lbs (typical average pack weight range for many hunters) and repeat step 3 trying to complete as quickly as possible. Again, mark HR midway and post and record time.
Step 6:
Compare your first test numbers and second test numbers from a time and HR perspective. Keep these numbers for your records. They will help us as we progress.
Now that you have completed this step, you have baseline data to begin developing a better fitness level. The beauty of this is it can be done anywhere and is not altitude specific nor standards driven. It is driven by you, the individual, and not from someone or somewhere else. One of the biggest pitfalls that we see in the training community from those who prescribe “hunt prep” programs is they consist of blanket programs where the “coach” prescribes a program arbitrarily and decides what they believe YOU should be able to achieve. The reality is that everyone is different and at is at different levels of fitness.
Telling someone to sprint 1/2 mile or pack a 30lb pack 4 miles on day one without any evaluation may not be suitable for someone who has never attempted either task, or with no previous training status. The mission is to develop success for YOU and generate a program that is created based on your ability and not the ability or perceived ability of someone else.
Usage of your HR Data:
Now that you have found both your resting HR and your estimated Max HR, its time to build out your program. This paragraph will allow you to build an easy, weekly plan over time and give the foundations of “Work Capacity” or your ability to sustain a workload over time.
Let's take your Max HR and reverse engineer it into zones. These zones are target ranges that you will use each day to build over time. The idea is the spend a prescribed amount of time in each zone for each day to build your cardiovascular system to handle the upcoming workload for the hunt.
Zone 1 - Base Building Zone
This is the zone that you will feel very comfortable in. It will almost feel like you are not working at all. That is actually the idea! This builds out the base of the metabolic system that you will need to build other zones. Think of it like the foundation of a house. A weak foundation will not support the weight of the house. These will be your longest sessions (60-90 minutes in length if possible).
Zone 2 - Aerobic Zone
This Zone will build your work capacity and allow you to recover faster from bouts of hard work. The idea is to build this zone so that your cardiovascular system is comfortable recovering in it. This is the frame of the house. These sessions will be 50-60 minutes in length.
Zone 3 - Steady State Zone
Steady State refers to what we call the “discomfort zone”, or the zone where you are approaching your threshold, but not near it yet. The ability to sustain these zones can only happen if your base is strong. Think of this as the roof of the house. The foundation and frame should be well built to support the weight of the roof. Zone 3 sessions will be 30-45 minutes in length.
Zone 4 - Threshold Zone
This zone will begin to tax your cardiovascular system and allow you to work harder, longer. This is where you begin to operate for short periods with a higher level of discomfort. This would be speed hiking or even running at a sustainable pace, but your HR is pumping and you are breathing heavy and hard. This zone is the exterior walls of the house that protect your house from the elements. These sessions will be roughly 30 minutes in length.
Zone 5 - Anaerobic/Interval Zone
Zone 5 is the level where you are working at max capacity for short bursts of time. Knowing that this workload isn’t sustainable for long periods, we will do “interval” work here. In other words, a period of max work (20,30 or 40 seconds), followed by a short period of rest to let your HR recover so you can repeat the interval. This is the finish work on the house!
How to build your Zones:
After you have run through the aforementioned tests and found your Max HR, use this easy formula as an example…
Estimated Max HR - 175bpm (example)
ZONE 5 - 170-185bpm - Interval Zone
ZONE 4 - 155-175bpm - Threshold Zone
ZONE 3 - 145-155bpm - Steady State Zone
ZONE 2 - 130-145bpm - Aerobic Zone
ZONE 1 - 120-130bpm - Base Building Zone
You can see that the zones are built in ranges that are roughly 15 bpm apart. This gives you a range to work within knowing that sometimes you will be in the low or the high end of the range.
You may have to tweak the zones based on the time you have to train, your capacity for workload in each zone, and your fitness level when you start training.
Now, let's build out a sample weekly plan to begin. We all would love to have the availability to train every day, but you also need to understand that the recovery days are as important as the work days (…not to mention that most of us have jobs and cant dedicate 3 hours a day, 7-days per week to training)!
Monday: Base Building Day
Zone 1 - 60-90 minutes if possible. This should be a brisk walk, hike, low intensity bike ride or swim. It will seem like you aren’t working hard on this day. That is correct. Keep it low but steady! Packing on base building days should be minimal (<20lbs).
Tuesday: Steady State Day
Zone 3 - 30-45 minutes if possible. This is the discomfort zone. You should feel like you are working hard, but you can sustain it. Heavy sweat and higher HR, but manageable for the prescribed time. This is a hard hike with a pack on, harder bike ride or sustained running pace. Get into the zone and teach yourself to enjoy the slight discomfort!
Wednesday: Recovery Day
You will take this day off from the Cardio program. You can do weight training or some movement skills, but should focus foam rolling, stretching and resting your body for the next day.
Thursday: Interval Day
Zone 5 - 20-30 minutes max. Today will be your toughest day of the week. Run, ride or speed hike with a pack. Warm up in Zone 2 for 5-10 minutes. Then start your intervals like this…
20 second max effort burst followed by 40 seconds of rest. Repeat 5 times for 5 minutes total. Recover for 5 minutes.
20 second max effort burst followed by 40 seconds of rest. Repeat 5 times for 5 minutes total.
Recover for 5 minutes.
For the first few weeks, only repeat the intervals twice. As you start to recover faster, add a 3rd or even a 4th interval working up to a 3 or 4 interval day by the end of the first month.
Friday: Base Building Day
Zone 1 - 60-90 minutes if possible. This should be a brisk walk, hike, low intensity bike ride or swim. It will seem like you aren’t working hard on this day. That is correct. Keep it low but steady! Any pack weight should be (<20lbs).
Saturday: Threshold Day (optional)
If your body is feeling good and not too fatigued from the week, get one Threshold Day in over the weekend. The goal here is to get your HR up to a barely sustainable level and keep it there for as long as you can. Based on our above formula of a Max HR of 175, try to get to or above 155 and keep it there for 20-30 minutes. Once again, hiking with a pack, running or biking would be good ways to achieve this day.
Sunday: Recovery Day (rest day - let your body recover)
Options and Variability:
The idea is to utilize the program variables to gradually progress and overload the cardiovascular and muscular system from day-to-day and week-to-week. You will notice that the rest changes from day-to-day and the distances and type of training as well. There is some recovery built in so that you can adapt as the volume of training increases. A well developed program is designed to have some ebb and flow where work, rest, intensity and volume have a wave-like trend allowing the body to adapt over time.
The user also has the ability to adjust as necessary to ensure that the program challenges you adequately without doing too much or too little. Once you reach a point in the first few weeks where you can match your unloaded hike times with the loaded times you should either lower your rest between sets, add additional weight to your pack, increase your pace or increase the distance of the effort. This is why it is important to keep track of your times daily and log them so you can mark your progress. On the other hand, if you struggle to maintain or complete any given day or session you should decrease distance or weight or increase the amount of recovery time between sets. It should be challenging but the goal is that you will be continually improving over time.
Take Away:
The bottom line is that no matter how hard you try there ins’t any way to replicate the affects of what it takes to put on miles, loaded down at altitude except to do literally just that. For those that do not have that luxury, your best defense is your preparation to “flatten the curve” as much as possible to minimize the uncontrollable variables that every hunter will face in the high country. If you put in the work and take a well documented approach, it will pay big dividends for you in the field physically and mentally. Coupled with the time, money and other preparation that you spent to go on a high country hunt, it is just as valuable to prioritize your training just the same.
If you like what you see here or would like to know more, we have a more detailed blog dedicated to this article that can be found at www.hunthikeharvest.com or feel free to contact us anytime or get your own customized program for your next hunt by emailing us at hunthikeharvest@gmail.com.
Joel Raether, Owner - Hunt Hike Harvest Outdoors
John Cole, Exercise Physiologist - Hunt Hike Harvest Outdoors


